Vintage Sewing Machine
A Thoughtful Embroidery Designer’s First Look
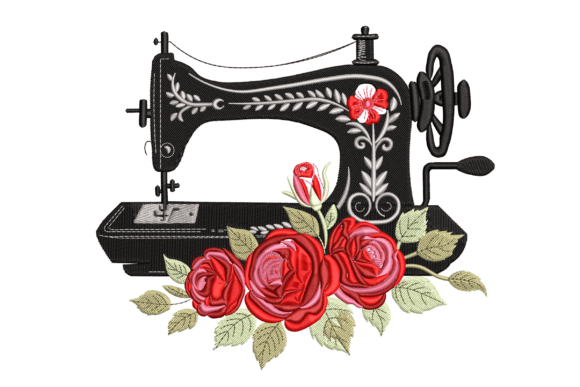
As someone who develops embroidery collections for boutique apparel—especially sweatshirts, hoodies, and lifestyle-focused totes—I approached the Vintage Sewing Machine machine embroidery design with quiet curiosity. Not every retro motif translates well to modern garment embroidery, but this one landed with immediate visual warmth. It reads as playful yet timeless, with clean outlines, balanced negative space, and just enough mechanical detail (spool, foot pedal, curved arm) to feel authentic—not cartoonish. It doesn’t shout; it invites. That subtle personality makes it ideal for brands that value craftsmanship without leaning into kitsch.
How It Performs Across Boutique Apparel
For a small sweatshirt or hoodie collection—think neutral heathers, oatmeal fleece, and soft pastel French terry—the Vintage Sewing Machine holds its own in chest placement. Its moderate width and vertical proportion scale beautifully on relaxed fits. On oversized garments, it avoids looking lost because the design carries visual weight without excessive stitch density. I’d place it centered 3–4 inches below the collar seam for instant cohesion.
As a sleeve accent? Yes—but only on the upper bicep, where fabric tension stays consistent. The curves of the machine’s base and arm respond well to gentle contours, unlike overly rigid motifs that pucker on curved surfaces. For back designs, it works best when paired with minimal text (e.g., “Stitch With Intention” in a fine sans-serif) or used solo on oversized hoodies where breathing room enhances its charm.
T-shirt embroidery benefits from its balanced stitch density: not so light it fades on dark cotton, not so dense it stiffens lightweight jersey. On denim jackets, it adds nostalgic texture without overwhelming the fabric’s grain—especially when stitched in matte cotton thread over medium-weight stabilizer. And for tote bags? It’s a standout. The design’s upright stance and clear silhouette read cleanly at arm’s length, making it highly effective for lifestyle product photos and printable mockups.
Where to Use It—And Where to Pause
The Vintage Sewing Machine shines on stable, low-stretch fabrics: midweight cotton, twill, canvas, and brushed fleece. On ribbed fabric (like hoodie cuffs or neckbands), I’d avoid it unless using a cutaway stabilizer and reducing top tension slightly—those fine spool details can distort if the ground fabric shifts during stitching.
Dark garments require thoughtful thread color choices. A warm cream or antique white thread gives vintage authenticity, while charcoal gray offers subtle contrast without sacrificing legibility. Avoid ultra-bright whites on black—heavy satin stitches can glare under studio lighting and weaken the handmade product feel.
Small chest placement is safe and effective, but steer clear of placements near side seams or underarm gussets where stretching occurs. Also, double-check Creative Fabrica’s product details for recommended hoop size before digitizing for commercial embroidery—you’ll want enough margin around the design to prevent hoop marks on finished product edges.
Design Personality Meets Brand Strategy
This isn’t just decoration—it’s brand reinforcement. For Etsy sellers and small shop owners, the Vintage Sewing Machine subtly signals care, continuity, and tactile craft. It aligns with audiences who appreciate slow-making, sustainability, and heirloom sensibility. When repeated across a collection—say, on sweatshirts, matching totes, and gift tags—it builds visual consistency without feeling repetitive. That consistency boosts buyer trust: customers recognize your aesthetic before reading a single product description.
In social media graphics and digital embroidery file previews, its strong silhouette converts well at thumbnail size. It also photographs cleanly against natural light and textured backdrops—key for lifestyle product photos that elevate perceived value. Unlike trend-driven motifs, it won’t date quickly, supporting long-term inventory planning for boutique brands.
Practical Notes Every Embroidery Designer Should Confirm
- Test on scrap fabric first—especially if working with new fabric texture like loopback fleece or organic cotton blends.
- Match stabilizer to garment weight: tear-away for stable cotton tees, cutaway for stretchy knits or ribbed hems.
- Review thread color contrast before bulk production—what reads well on screen may vanish on dark apparel.
- Confirm hoop size and file compatibility with your embroidery machine—Creative Fabrica embroidery files sometimes include multiple formats; choose the one optimized for your software.
- Inspect stitch density visually—not just in software. Overly dense areas can cause stiffness or skipped stitches on delicate fabrics.
- Test on the exact garment you’ll sell, not just a similar fabric swatch. Garment construction (seams, darts, fabric recovery) changes how embroidery lies.
- Compare placement options on a mockup before stitching live inventory—chest, sleeve, and back each create different brand impressions.
- Verify licensing terms on Creative Fabrica before selling finished apparel—some embroidery files allow commercial use, others require extended licenses.
Final Thoughts for the Boutique Maker
The Vintage Sewing Machine isn’t flashy—but that’s its strength. In an era of oversaturated digital design, it offers quiet confidence. It supports custom apparel that feels intentional, not algorithmic. Whether you’re launching a capsule collection of cozy seasonal outfits or building a signature line for your Etsy shop, this machine embroidery design delivers personality without pretense. It works for Sewing Crafts enthusiasts and serious commercial embroidery operations alike—because good embroidery shouldn’t draw attention to itself. It should make the wearer smile, the buyer pause, and the maker proud.